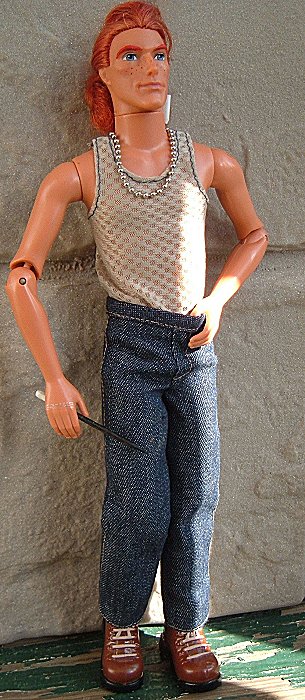
Bill Weasley

Series 1
Finished : April.2004
Original Identity : Disney’s John Smith from ‘Pocahontas’ (Mattel)
JKR’s Specs : Tall, long hair kept in ponytail, fang earing, Cool!
Choosing a Weasley : I owned this doll for awhile. I got a set for Christmas as a kid that contained John Smith and Pocahontas from the Disney version of the tale. He was always one of my favorite dolls when it came to male face-molds. When I started to look through the Kelley Avenue males for positions in the Weasley Family their really was no one else suited. Almost immediately I committed to making this doll my Bill.
Making a Weasley : {view before Image}
I consider this my first real custom, because at this point I was looking up all I could on “making” OoAK (One Of A Kind or Custom dolls). Before I even chose to pursue making my John Smith into Bill Weasley, I thought about re-rooting a Ken for Bill, because Bill had to have long hair. Then John came to me and he already had ponytail length hair. So I began to wonder was there a way to change the hair he already had red. I didn’t think “human” hair dye would work with the hair being synthetic and research among other doll enthusiast confirmed this for me. But there was a way, two ways actually. One involving diluted paint and another involving RIT dye (a popular clothes dying agent). I went with the RIT method. Dying doll hair is annoyingly involved process where the doll has to not only be dyed carefully, but has to be dryed upside down to avoid dying the doll. But, four years after his dye job Bill is still a red head (with a bit of a golden tint) so I consider it a success.
Bill was also my first re-paint/face paint job. I re-did his eyebrows (as red hair needed red brows to match) and gave him some freckles. Freckles are HARD. You have to be very very careful with this really tiny brush that barely has any brush! If anyone has seen good re-paints it’s clear mine is very amateurish.
For Bill’s clothing I just raided my Ken clothes for something that had him looking casual, but cool. When I found the leather jacket I knew it was his. No robes for Bill Weasley, thank you very much. Even though I knew I was going to have to look into braving needle and thread later in the project to give everyone else some Wizard’s robes. He also got a ‘fang’ earring sort of. It’s actually the end of a plastic fork. I broke one of the fork ends, heated a needle and sewed a hole into the plastic. Then I used a staple to attach the earring to his ear.
Bill was originally on an annoyingly stiff (and short of height) “bent arm” ken body. I didn’t know quite where to look to get him a decent articulated body. He had sort of a tan to him that didn’t suit any of the pale bodies I found. Luckily (6 months later), a web friend of mine at the time (and fellow doll/action figure enthusiast) named Omar told me he had a hot skating Ken body he was willing to give me that he though would match his coloring. This gave Bill not only a better “tall, long, and lanky” look, but allowed him to be about as articulated as you can get on a Ken body.
My Thoughts on the Result : I adore my Bill, but when he was first created I was very critical of him. Mostly, the dye job lightening pretty quickly and the amateur face paint. But looking back on it I did a pretty good job for what was really my first custom work ever. The only huge flaw is that when he was originally created he was on that stiff “bent arm ken” body. Once Omar solved that problem for me he was perfect. The good thing about doing Bill is I didn’t have any movie image messing with my head along the way.


